ROLLER BANDAGE FOR HAND AND
WRIST.—For the hand and wrist, a figure-eight
bandage is ideal. Anchor the dressing, whether it is on
the hand or wrist, with several turns of a 2- or 3-inch
bandage. If on the hand, anchor the dressing with
several turns and continue the bandage diagonally
upward and around the wrist and back over the palm.
Make as many turns as necessary to secure the
compress properly (fig. 3–5).
ROLLER BANDAGE FOR ANKLE AND
FOOT.—The figure-eight bandage is also used for
dressings of the ankle, as well as for supporting a
sprain. While keeping the foot at a right angle, start a
3-inch bandage around the instep for several turns to
anchor it. Carry the bandage upward over the instep
and around behind the ankle, forward, and again across
the instep and down under the arch, thus completing
one figure-eight.
Continue the figure-eight turns,
overlapping one-third to one-half the width of the
bandage and with an occasional turn around the ankle,
until the compress is secured or until adequate support
is obtained (fig. 3–6).
ROLLER BANDAGE FOR HEEL.—The heel
is one of the most difficult parts of the body to bandage.
Place the free end of the bandage on the outer part of
the ankle and bring the bandage under the foot and up.
Then carry the bandage over the instep, around the
heel, and back over the instep to the starting point.
Overlap the lower border of the first loop around the
heel and repeat the turn, overlapping the upper border
of the loop around the heel. Continue this procedure
until the desired number of turns is obtained, and
secure with several turns around the lower leg (fig.
3–7).
R O L L E R B A N D A G E F O R A R M A N D
LEG.—The spiral reverse bandage must be used to
cover wounds of the forearms and lower extremities;
3-5
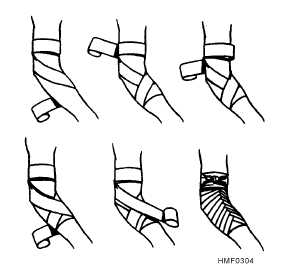
Figure 3–4.—Roller bandage for the elbow.
Figure 3–5.—Roller bandage for the hand and wrist.
Figure 3–7.—Roller bandage for the heel.
Figure 3–6.—Roller bandage for the ankle and foot.


