film are centered in the locator ring, the device is properly assembled and ready for positioning in the patient’s mouth.
Assembling The Posterior Device
Figure 1-12 shows a fully assembled posterior paralleling device. Refer to this figure during the following discussion.
Insert the film into the posterior bite-block as previously discussed.
NOTE:
The posterior device shown in figure 1-11 is used for film placement in the right maxillary and left mandibular quadrants. You must reassemble the device, rotating the locator ring and the bite-block, before using it in the left maxillary or right mandibular quadrants. Only the posterior device must be reassembled in this manner, the anterior device does not require reassembly.
Placing The Device
Once you have assembled the posterior paralleling device, place it in the patient's mouth. Be very careful not to injure the oral tissue. If the patient gags, use the remedies discussed earlier.
Guide the bite-block and the film packet into position, centering the packet behind the area being X- rayed. The film packet should be positioned far enough behind the tooth so it will be parallel to the long axis of the tooth.
After positioning the film packet, slide the locator ring down the indicator rod until the ring almost touches the surface of the patient's face. Then, position the tube head cylinder. The end of the cylinder should be parallel with the locator-ring, and its side should be parallel with the indicator rod.
Once these procedures have been accomplished, the film packet and the tube head are in proper alignment. You are now ready to expose the film.
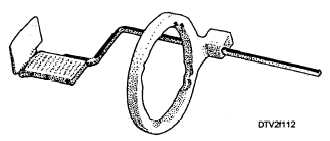
Figure 1-12 . - Assembled posterior parallelling device.
EXPOSURE ROUTINE FOR FULL MOUTH PERIAPICAL EXAMINATION
The full mouth periapical examination consists of 14 periapical radiographs (7 maxillary and 7 mandibular). The series includes the following films and sequence starting with the maxillary arch and proceeding to the mandibular arch:
1. Incisor area
2. Left cuspid area
3. Left bicuspid area
4. Left molar area
5. Right cuspid area
6. Right bicuspid area
7. Right molar area
GUIDELINES FOR TAKING PERIAPICAL RADIOGRAPHS, PARALLELING TECHNIQUE
The following guidelines apply if you are taking either a full mouth series, or an individual periapical radiograph. For training purposes, infection control barriers are not used in the photographs in this section.
In most cases, the X-ray machine is set at 10 mA for dental radiographs. The kVp may vary, depending upon the thickness or the region being radiographed. If the area being radiographed is edentulous (no teeth present), reduce the recommended kVp by 5. When you are taking radiographs on a child, reduce the recommended kVp to 70. Always consult the dentist before taking radiographs on a child. Because of the different types of X-ray equipment in use, the exposure time selector you use may not have the settings suggested. Consult the film manufacturer's instructions regarding the desired time setting to use.
Before you perform an individual radiograph or a full mouth periapical examination, prepare the patient, using the procedures explained earlier. When you are using the parallel film placement technique, the position of the patient's head is not critical. But, it is best to adjust the head rest on the dental chair so that the patient's "plane of occlusion" is parallel with the floor and the "midsagittal plane" is perpendicular to the floor (fig. 1-13.)
It is important to properly position the paralleling devices and the tube head cylinder when using the paralleling placement technique. Continue Reading