FABRICATING TRAYS WITHOUT SPACERS
Custom trays for complete denture patients are often made without spacers and adapted directly to the ridge. If a spacer is not used for tray construction, the undercuts on the cst must be eliminated very carefully using baseplate wax. Failing to do so will result in a damaged cast or tray when you attempt to remove the hardened tray.
Preparing the Cast
First, paint the cast with two layers of tinfoil substitute to prevent the acrylic resin from sticking. Next, use baseplate wax to generously block out (fill in) all undercuts within the tray area outlined on the cast as shown in figure 8-33(B).
Mixing the Resin
Using premeasured amounts of monomer and polymer, add the powder to the liquid and mix the materials. Allow the mix to set until it reaches the doughy stage.
Adapting the Resin
Use a simple stone mold to control the shape and thickness of the resin dough. This preshaped resin mass results in a tray of consistent quality when adapted to the cast.
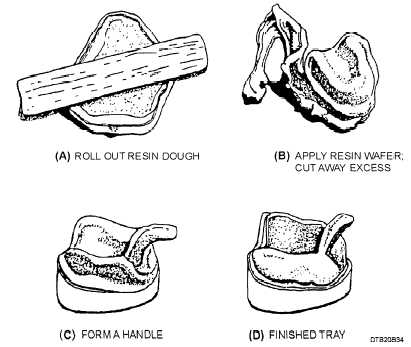
Lightly coat your fingers with petrolatum before placing the dough in the stone mold. Be sure the mold is also coated with petrolatum. Cover the dough with a moistened polyethylene sheet. Quickly roll out the resin to match the mold's shape and thickness as shown in figure 8-34(A). Trim away the excess dough and lift the acrylic resin blank from the mold.
Center the resin over the cast and rapidly adapt the dough by hand to the cast's surfaces. Be careful not to create thin spots by pressing too hard. Shape the resin to the borders and cut away the excess with a sharp knife as shown in figure 8-34(B).
Next, attach the handle to the tray, ensure the handle is strong enough to withstand considerable force, and that its shape will not interfere with lip movement. Mix another small amount of tray resin. When polymerization reaches the dough stage, form it into an L shape. Use a few drops of monomer to moisten the attachment site between the handle and the tray. Press the handle onto the moistened area. The fluid ;monomer should provide good bonding. If you work fast enough, you should be able to use the unpolymerized excess from the first mix for the handle as shown in figure 8-34(C).
Finishing the Tray
After the acrylic has set, remove the tray from the cast and remove any wax adhering to the inside of the tray. Trim the tray's flanges back to the peripheral

Figure 8-34. - Fabricating custom trays using the dough method.
Continue Reading