border markings as drawn by the dentist and shown in figure 8-34(D). Use the bench lathe with an arbor band to remove bulk. The posterior border of the maxillary custom tray is supposed to extend a short distance onto the soft palate. Mandibular custom trays cover the retromolar pads. Use acrylic finishing stones and burs for finer details. Be sure there are no sharp edges on the tray's borders.
FABRICATING A TRAY WITH SPACERS
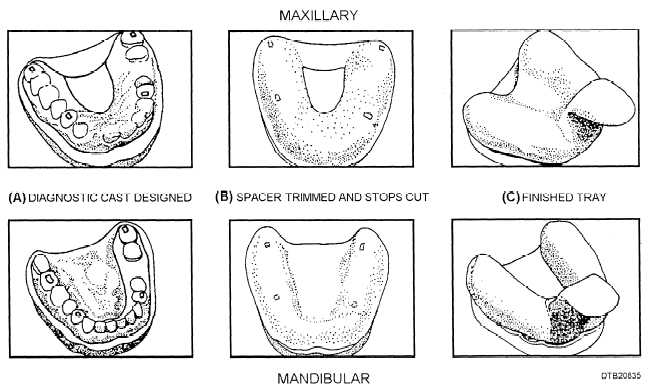
The preceding paragraphs described trays that were closely adapted to the diagnostic cast. In contrast, custom trays for fixed restorative patients are always made over wax spacers. The design for this type of tray appears in figure 8-35(A). With the exception of the tray's design and the use of a wax spacer, the procedures for fabricating a fixed custom tray are the same as we mentioned before. Let's briefly look at the differences.
Applying a Wax Spacer
After the dentist traces the outline on the diagnostic cast, you can fill the undercuts, and adapt two layers of baseplate wax to the tray area on the cast. Adapt each layer of wax, one layer at a time. Cut out four small pieces of the baseplate wax over the crest of the ridge areas outlined in the molar and cuspid regions for tissue stops as shown in figure 8-35(B). Remove the spacers from the cast and apply a tinfoil substitute to the gypsum surfaces of the cast to prevent the acrylic resin from sticking. Place the spacer back on the cast and apply a thin layer of petrolatum to the surface of the baseplate wax. This will make removal of the wax from the polymerized tray easier.
Fabricating the Tray
Use the self-curing dough method to make the tray. After the resin is hard, remove the tray from the cast and pull the baseplate wax off the tissue surface of the tray. (Four tissue stops should appear on the ridge areas where the four pieces of baseplate wax were originally cut out.) Trim any excess acrylic resin to the outline border on the cast. Round and smooth the borders of the tray. Your finished trays should appear like those in 8-35(C). Be certain to clean away all traces of petrolatum that might be present on the tissue surface of the tray. (Sandblasting does this very effectively.) Clean and disinfect the tray, place it on the cast for storage.
FABRICATING MOUTHGUARDS AND VACUUM-FORMED TEMPLATES
In addition to pouring and trimming study casts, and fabricating custom trays, you may be called upon

Figure 8-35. - Fabricating custom trays over wax spacers.
Continue Reading