You may use a rolled compress, battle dressing, or bandage as a pressure pad. If the materials are not available, you may use any round, smooth pressure object, such as a rolled handkerchief, a flat stone, or a rifle shell. If no pressure object can be found, apply the band without it.
You may use any long, flat material, (i.e., bandage, belt, stocking, strip of rubber, or necktie) as the tourniquet band. The band must be flat. Narrow materials such as rope, wire, or string should not be used; they will cut into the casualty's flesh.
Most Navy emergency medical kits contain a webbed band with a buckle on it. The band is tightened by pulling one end through the buckle. This eliminates the need for a separate device to tighten the band. If you are using another type of band, you may use a small, short stick to tighten it.
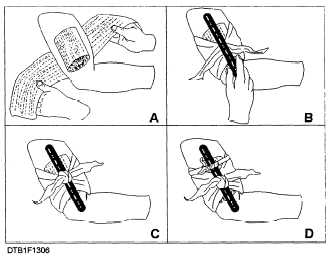
There are some general rules to keep in mind when applying a tourniquet. Apply it over a main artery between the wound and the main part of the body. Apply the tourniquet as close to the wound as possible, making sure that the tourniquet is not touching the wound and that it is not placed over a joint. Once a tourniquet is correctly applied, only experienced medical personnel may loosen or remove it. Refer to figure 13-6 and use the following steps to apply a tourniquet:
1.Place the pressure pad or similar pressure object over the main artery supplying blood to the injured extremity (see A in fig. 13-6).

Figure 13-6. - Steps in tourniquet application.
2. Wrap the band once around the extremity and over the pressure pad. Place a short stick on the crossing band (see B in fig. 13-6).
3. Knot the band over-the-stick (see C in fig. 13-6).
4. Twist the stick to tighten the tourniquet just enough to control the flow of blood. Do not make it any tighter than necessary. A tourniquet that is too loose will not control the bleeding; one that is too tight may further injure the extremity.
5. Tie the stick in place with a strip of bandage or other material (see D in fig. 13-6).
If bleeding fails to stop after the band has been tightened, there is a good chance the pressure pad is not placed directly over the artery. If this is the case, loosen the tourniquet and reposition the pad.
After you have brought the bleeding under control, place a sterile dressing securely over the wound. Do not cover the tourniquet with a dressing. Do not loosen the tourniquet. Again, once a tourniquet has been correctly applied, only experienced medical personnel may loosen or remove it.
After placing the dressing, treat the casualty for shock. Finally, complete the field medical card. In addition, write the letter "T" and the time the tourniquet was applied (e.g., T-0830) on the casualty's forehead. Use a skin pencil, colored antiseptic, ink, or crayon for this purpose.
Shock
Review the shock section in chapter 9, Dental Technician, Volume 2, NAVEDTRA 12573, for causes, signs, symptoms, and treatment of basic shock, fainting, anaphylactic shock, and insulin shock.
Shock may develop at the time of the injury or hours later. Never put off treating a casualty for shock until the signs and symptoms appear. Begin treatment immediately. If shock has not yet developed, the treatment may prevent it from developing. If shock has already developed, the treatment may prevent it from becoming worse.
TREATMENT OF SHOCK. - To prevent shock or to treat shock that has already developed, you should position the casualty, conserve body heat, and relieve pain.
Position the Casualty. - The casualty should be lying down. Never let that person sit up, stand, or walk around. Generally, the standard position for the shock casualty is lying on the back with the feet elevated 6 to
Continue Reading