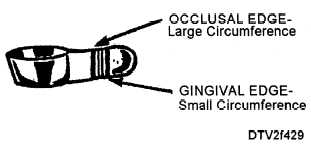
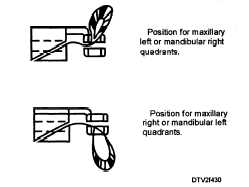
To assemble the matrix, hold the retainer in one hand with the slots in the guide posts and locking vise facing upward. Turn the Large inner nut counterclockwise to position the locking vise close to the guide poet. turn the small outer nut counterclockwise until the rod is not visible in the locking vise slot. In your other hand, grasp the band with the ends placed evenly together. Place the edge of the band with the larger circumference (occlusal edge) into the diagonal slot at the vise end of the retainer. With the. band placed in this manner, the larger circumference is toward the occlusal surface and the smaller circumference toward the gingiva, as shown in figure 4-29. Continue to ease the band through the inner guide post slot. As figure 4-30 shows, position the band through the left guide post for teeth on the mandibular right or maxillary left quadrants. For teeth in the mandibular left or maxillary right quadrants, position the band through the right guide posts. Turn the outer nut clockwise until the rod tip presses firmly against the band in the lock vise to secure the band. Turn the inner nut counterclockwise to increase the size.
When the assembled matrix is placed over the prepared tooth, the slot opening of the retainer and the small circumference of the band are positioned toward

Figure 4-29. - Large and small circumferences of the band.

Figure 4-30. - Positioning the band to the right or left for the appropriate quadrants.
the gingiva, and the retainer is placed along the facial surface of the tooth. The handle of the retainer extends out of the oral cavity at the corner of the lips. The dentist gently manipulates the matrix band into the inter-proximal space on either side of the tooth. The dentist then places an index finger or thumb over the occlusal surface to hold the band in place and tightens the band by turning the inner nut clockwise to fit snugly around the tooth. At this time, the dentist may decide to place a wedge along the side of the matrix band.
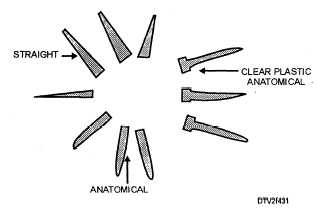
Wedges Wedges are small, tapering, triangular pieces of wood or clear plastic about 1/2 inch in length. Wedges are available in various sizes, which may be color coded. They are either plain (straight) or anatomically shaped (fig. 4-31). Clear plastic anatomical wedges are designed for use with light-cured materials.
Since the general shape oftooth crowns varies, the matrix band around the tooth may not always produce a snug fit. This leaves space through which condensed restorative material can be pushed out to create an undesirable overhanging restoration. The dentist uses wedges to force the matrix band or strip tightly against irregular tooth surfaces to prevent these spaces. This snug fit then restricts the firmly condensed restorative material to the confines of the prepared cavity margins and the band itself.
Matrix Removal
Because new restorations fracture easily, use extreme care when removing the matrix band. To remove the matrix band and retainer, the dentist, first

Figure 4-31. - Wedges
Continue Reading