
Figure 8-37. - adapting a denture tooth to the edentulous space.
template off the cast for final trimming with scissors. Cut out the section needed for the provisional restoration plus one or two uninvolved teeth anterior and posterior to it as shown in figure 8-38. When you are finished, clean and disinfect the template; and place it and any of the unused arch sections back on the cast so they won't distort. Often, subsequent restorations are made for the same patient, and the unused arch sections are kept in case they will be needed at a later date.
SIMPLE ACRYLIC REPAIRS
Occasionally, you will be required to perform minor repairs on complete and removable partial dentures. These repairs may include fractured dentures, or replacing fractured, missing or loose teeth. These repairs may be caused by changes in the oral tissues, careless handling, etc. The dentist will decided if any impression of the patient's mouth is needed for the repair, and will tell you what needs to be done to complete the repair. Since every repair is a little different, these next procedures describe some, but not all, of the possible repair solutions. If you need assistance, refer your questions to the dentist or prosthetic technician.
DENTURE BASE REPAIRS
Figure 8-39 shows a simple denture base fracture. The repair procedures will include aligning the fractured parts, pouring a plaster cast (matrix),
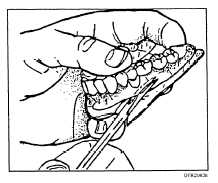
Figure 8-38. - Trimming away excess material with scissors.
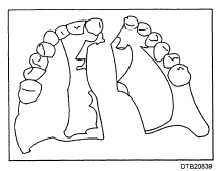
Figure 8-39. - Simple denture base fracture.
widening the fracture line and making retentive grooves, applying self-curing acrylic resin, adjusting, and polishing. When the pieces of the denture base cannot fit against one another in a precise relationship, or one or more fragments have been lost, this type of a fracture is classified as complex. Since complex fractures should be repaired by prosthetic technicians, they will not be covered in this chapter. To repair a simple denture base fracture, perform the following steps (A-H) shown in figure 8-40:
1. Align the fractured denture parts and apply sticky wax over the fracture line on the external surfaces of the denture.
2. Stabilize the parts by positioning denture burs with sticky wax as shown in step A.
3. Block out all undercuts on the internal surface that will be exposed to the plaster with a wet pumice mix or block out wax (step B). Do not block out undercuts along the fracture line. Blocking out the undercuts enable you to remove the plaster cast after it sets.
4. Prepare a plaster mix.
5. Slowly pour the plaster into the internal surface of the denture. The plaster cast should cover the fracture line, but not the entire denture. This procedure is accomplished by holding the denture in you hand and gently resting it against the vibrator.
6. Place the denture in an upright position (step C) and allow the plaster to cure.
7. Once the plaster is set, gently remove it from the cast.
8. Remove the denture burs and all traces of the sticky wax and pumice.
9. With a new denture bur, widen the fracture lines (step D) on the denture and place retentive grooves along the fracture line.
10. Paint two thin, even coats of tinfoil substitute on the cast (step E).Continue Reading