proximal contact when the floss is carried through. Floss placed on the rubber dam itself tears the dam and requires the passing of two thicknesses of the dam through the contact. Once the floss passes the contact of the teeth, release the lingual end of the floss. Loop this end toward the opposite end and floss through the contact again. Now, gently remove the floss by pulling it from the side horizontally, rather than attempting to pull the floss back up through the contact vertically. Continue using the floss to invert the inter-proximal septum, mesially and distally as well. Inversion of the rubber dam turns the edges of the dam inward or under, around the isolated teeth, to provide a seal. After this is completed, pass the rubber dam clamp forceps and attached clamp to the dentist for final placement on the tooth. Adjustment of the rubber dam material on the frame can be made at this time to ensure a smooth and stable fit. Wrap the ligature attached to the clamp around a projection on the side of the frame. This prevents the clamp from becoming a dangerous projectile if it should spring off the tooth. Pass a dull instrument, such as a stellite instrument, to the provider for inversion of the rubber dam on the facial and lingual areas of the exposed teeth. Dry the exposed teeth with air from the three-way syringe as needed to assist in the inversion.
The second method places the rubber dam clamp on the tooth first. Then slip the rubber dam material over the clamp. Next, in either order, attach the frame and expose the remaining teeth through the holes. Secure the clamp ligature to the frame. Then invert the mesial and distal septum with floss, and the facial and lingual areas with a dull instrument accompanied with air from the three-way syringe.
In the third method, the clamp is held in the rubber dam forceps and the rubber dam placed over the bow of the clamp. Holding the edges of the rubber dam with your fingers, use the forceps to carry the dam and clamp into the patient’s mouth. Place the clamp on the tooth and remove the forceps. Continue the placement as in the second method. The last two methods of rubber dam placement are valuable when a rubber dam must be placed by one individual rather than two. After the restoration is placed, remove the rubber dam.
Removal
Before the rubber dam is removed, use the water syringe and high-volume evacuator (HVE) to flush out all debris that collected during the procedure. Rather than pulling the septa through the contact of a newly placed restoration, the septa is cut. Stretch the rubber dam material outward in the facial area of the isolated teeth. This pulls the septa facially to provide access for cutting. Use a pair of small blunt-nose scissors to cut each septum of the rubber dam from the facial aspect (fig. 4-25). When all the septa are cut, gently pull the dam lingually to free the rubber dam completely from the interproximal spaces. Use the clamp forceps to remove the clamp. Simultaneously, remove the clamp ligature from the frame. Set the clamp forceps and clamp aside. Now, remove the dam with the frame attached. Wipe the patient's mouth, lips, and chin with a tissue or gauze. Carefully inspect the dam on a flat surface for missing pieces. If a fragment of the rubber dam is missing, check the corresponding interproximal area of the oral cavity with a mirror and explorer. Pieces of the rubber dam left under the free gingiva cause severe gingival irritation. Use dental floss to remove any material stuck between the teeth. Rinse the patient’s mouth with the water syringe and HVE to remove all debris from the oral cavity.
MATRIX RETAINERS
Matrix retainers are used to hold the matrices (metal bands or strips) firmly in place around a tooth. Matrix retainers and metal bands are used in combination for a temporary mold while the filling material is being packed into place. The Tofflemire retainer (or matrix retainer) is available in three different designs: the universal straight, contra-angle, and contra-angle junior (pedodontic) shown in figure 4-26. These retainers are practically maintenance free. They can be heat sterilized along with other dental instruments. Your part in maintaining matrix retainers is to check them periodically and replace those with badly worn screw threads. You are also expected to attach the correct matrix band to the appropriate retainer in anticipation of the dentist’s needs.
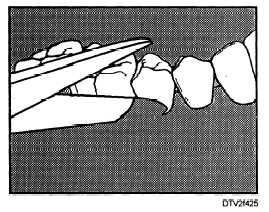
Figure 4-25. - Cutting rubber dam septum.
Continue Reading