2. Right mandibular posterior teeth
3. Left mandibular posterior teeth
4. Maxillary anterior teeth
5. Right maxillary posterior teeth
6. Left maxillary posteriorteeth
Starting with the mandibular anterior teeth, examine the facial and proximal surfaces. Then, scale those surfaces. Next, examine and scale the lingual and proximal surfaces. After you have completed the mandibular anterior teeth, follow the routine until the entire dentition (all teeth) has been examined and scaled.
CALCULUS REMOVAL
Dental Technicians are only allowed to remove supragingival calculus. Supragingival calculus is defined as calculus above the gumline. Subgingival calculus removal and root planing are only to be performed by a dentist or dental hygienist. Figure 3-21 illustrates subgingival and supragingival calculus.
Scaling the teeth removes calculus by mechanically fracturing the deposits off each tooth. It is relatively simple to remove large deposits of supragingival calculus, but removing the smaller pieces that are left behind when the larger pieces fracture off takes practice to ensure the tooth surface is calculus-free.
Supragingival calculus may be detected visually. It will appear as a white, chalky, or yellow deposit on the tooth surface. Drying the tooth surface with air from the three-way syringe will make a deposit easier to see.
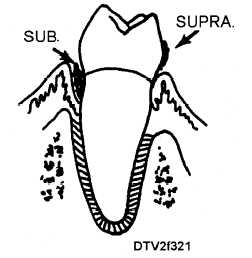
Figure 3-21. - Subgingival and supragingival calculus.
You can also detect supragingival calculus by passing the point of an explorer over the teeth. Enamel will feel hard and smooth as the explorer tip passes freely over it. Calculus feels rough and will interfere with the free movement of the explorer tip. The easiest way to detect supragingival calculus is by using a disclosing agent. This will enable you to visually identify stained areas of plaque and calculus.
SCALING INSTRUMENTS
Your choice of an instrument is determined primarily by the amount of calculus present. If the patient has a large amount of supragingival calculus or heavy stain, you may want to start your scaling procedure with the ultrasonic or sonic instrument. After you have removed the calculus or heavy stain, you then can use the various hand instruments to remove the remaining deposits. If the patient has a light to moderate accumulation of supragingival calculus, you may choose to complete the entire procedure with hand instruments.
After you have located the calculus deposits, you are ready to perform the instrumentation necessary to remove them. There are four basic scaling strokes: exploratory, vertical, horizontal, and oblique.
Exploratory Stroke
The exploratory stroke is used to determine the general outline of the deposits. To perform the exploratory stroke, hold the scaler or curette lightly in a modified pen grasp. Holding the instrument lightly will increase your sense of touch. Establish a finger rest, then move the cutting edge of the blade across the tooth surface toward the gingiva. When you feel the calculus, continue moving the blade until the cutting edge reaches the border of the deposit. Do not insert the blade below the gingiva. Position the cutting edge of the instrument next to the border of the calculus deposit (fig. 3-22). You are now ready to change to a vertical, horizontal, or oblique scaling or working stroke (fig. 3-23) depending on the location of the calculus.
Vertical Stroke
The vertical stroke parallels the long axis of the tooth. Use this stroke to remove calculus from the proximal surfaces of the teeth. It is considered the 3-12