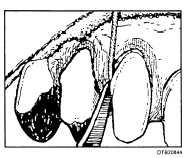
Figure 8-44. - Placing gingival retraction cord into gingival crevice.
actually begins during tooth preparation at the stage when the gingival area is isolated with retraction cord. A properly positioned cord serves two functions:
It displaces the free gingiva for completing the tooth preparation.
It opens the gingival sulcus for the impression.
Before you prepare the impression materials, you must paint the custom tray with a tray adhesive that is compatible with the impression material. Be sure to accomplish this well in advance to allow the adhesive to set.
At this stage, one end of the cord should protrude from the sulcus so it can be easily grasped with cotton forceps for removal before injecting the impression materail into the gingival sulcus. Additional preparation of the mouth for the impression includes, irrigation, aspiration, and isolation of the preparation site with clean dry cotton rolls.
The impression materials that the dentist will select for use may be light-cured, or supplied as a two-paste base and catalyst system that is mixed in equal length. Some manufacturers market the two-paste impression materials in a manner that eleminates the need to manually mix the material. These materials are mixed using a gun-like dispenser, which is loaded with twin tubes of catalyst and base. Whatever material the dentist chooses, always refer to the manufacturer's instructions to mix the material.
Usually, impression material of two different viscosities (bodies) are used. You will prepare regular-bodied material and load it into the custom tray, and also prepare a light-bodied material and load it into a syringe (if not using the gun-like dispenser method). As the retraction cord is removed, the dentist injects the light-bodied material around the sulcust of each individual tooth preparation. During this procedure, you assist with retraction of the lip, cheeks and/or tongue, and have the impression filled custom tray ready for insertion. Once the dentist seats the tray, you will place a saliva ejector in the patient's mouth to remove excess saliva while the impression material sets. Once set, the dentist removes the impression and inspects it for quality. Allow you patient to rinse with water, and provide a hand mirror and tissue to allow them to clean excess material from the face. Before you take the impression to the laboratory, be sure to disinfect it according to current infection control standards.
Bite Registration
The dentist may determine that an accurate bite registration is necessary to establish the proper occlusal relationship during mounting. A bite registration can be made in many ways. Some of the common methods use reinforced bite registration wax, or dental stone mixed with slurry water (water from model trimmer). Interim (Temporary) Crown or FPD The last step in this appointment is that a temporary crown or FPD must be made to cover and protect the prepared tooth or teeth while the permanent prosthesis is being fabricated. To protect tooth sensitivity, the temporary should extend to the margin of the tooth preparation but not beyond it. A temporary that extends beyond the margin into the gingival tissues will become an irritant to the tissue. A properly constructed temporary will have the following characteristics:
Smooth and polished so it does not irritate the tongue, lips, cheeks, or gingival tissues.
Provides the appropriate occlusal form and relationship to any opposed teeth.
Provides appropriate proximal contact relationships with unprepared adjacent teeth to prevent drifting.
Provides acceptable esthetics if placed in an anterior area.
Temporary crowns or FPD's can be constructed from preformed acrylic resin and aluminum shells. Plastic stints and alginate impressions can also be used with self-curing acrylic resin to make an interim prosthesis.
When the temporary is finished, a temporary cement such as zinc oxide and eugenol is used to deliver the interim restoration onto the prepared tooth or teeth. Consult the manufacturer's instructions for
Continue Reading