Procedure for placing a temporary crown on a type II fracture:
1. Select a plastic crown form. Trim the form with scissors to adapt it to the fractured crown. Ensure that the entire fracture will be covered.
2. Also ensure the incisal edge in not in occlusion with the opposing teeth, while fitting the plastic crown.
3. Place two or three small holes in the incisal edge of the crown form with a sharp explorer.
4. Fill the crown form with a thin mix of calcium hydroxide or zinc oxide and eugenol.
5. Gently place the crown form over the fractured crown. You will see any excess material expressed from the holes of the incisal edge while placing the crown.
6. Remove any excess material from and around the crown with gauze and cotton pellets
7. Instruct the patient to eat a bland diet and avoid extremely hot and cold foods or liquids and sticky foods.
Symptoms (Type III - Enamel/Dentin Fracture With Pulp Exposure)
A patient with a type III tooth fracture may complain of the following:
Severe, throbbing pain
Very rough or sharp edges
Severe pain from heat, cold, or air
Inability to chew food
Signs
Upon examination of a type III fracture, you may observe: Extensive fracture with the pulp exposed Most or all of the crown is fractured off Bleeding from crown fracture
Treatment
Perform emergency treatment guidelines. In almost all cases of a fracture this severe, the dental officer will treat the patient. Only in rare cases would the Dental Technician treat the patient. The following is a treatment plan that the dental officer might authorize to treat a type III fracture.
1. Place a crown form over the affected tooth. Refer back to this procedure under the treatment for type II fractures. At times, it may be impossible to place a crown form over a fractured tooth. The pressure of the crown form against the pulp tissue may cause the patient pain or there may not be enough tooth structure left for retention of the crown. If this occurs, a splint rather than a crown form is placed on the tooth as shown in figure 6-7.
2. To make the splint, prepare a large mixture of zinc oxide and eugenol as described in Dental Technician, NAVEDTRA 12573, chapter 4, "Restorative Dentistry." Add cotton fibers from a cotton pellet to the mixture for strength. The mixture should have a dough-like consistency for molding the splint.
3. Place the splint so it covers the affected tooth and the teeth immediately adjacent to it (fig. 6-7). Ensure that the mixture is placed well up on the lingual and facial aspects of the gingival tissue. Gently compress the splint between your finger and thumb to lock it into the interproximal spaces.
4. Trim the splint from the incisal edges of the teeth. Check the occlusion to see if the splint is interfering with the patient’s bite.
5. Advise the patient to let the splint harden for several hours before attempting to eat. Tell the patient to return to sick call ASAP for more definitive care.
Symptoms (Type IV - Root Fracture)
A patient with a type IV tooth fracture may complain of the following: Severe pain from heat, cold, air Inability to eat anything without severe pain A tooth that is moving or loose
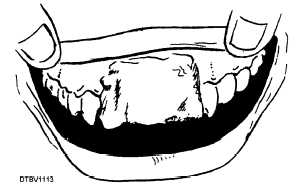
Figure 6-7. - Properly placed splint.
Continue Reading