CAUTION: After cleaning the puncture site, only the sterile needle should be allowed to touch it.
8. “Fix” or hold the vein taut. This is best accomplished by placing the thumb under the puncture site and exerting a slight downward pressure on the skin or placing the thumb to the side of the site and pulling the skin taut laterally. (See figure 6-2).
9. Using a smooth continuous motion, introduce the needle into the side of the vein at about a 15 degree angle with the skin (fig. 6-2). (Bevel of the needle should be up.)
10. Holding the barrel with one hand, push the tube into the holder with the other hand and watch for the flow of blood into the tube until filling is completed.
11. While holding the with one hand, release the tourniquet with the other.
12. Place a sterile gauze over the puncture site and remove the needle with a quick, smooth motion.
13. Apply pressure to the puncture site and instruct the patient to keep the arm in a straight position. Have the patient hold pressure for at least 3 minutes.
14. Take this time to invert any tubes that need to have anticoagulant mixed with the blood, then label the specimens.
15. Reinspect the puncture site and apply a bandage.

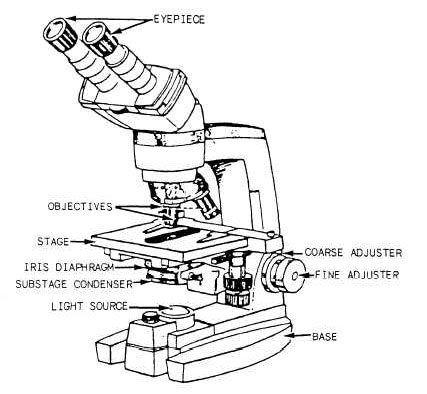
Figure 6-3.—Microscope.
THE MICROSCOPE
Before any attempts are made to view blood smears, urinary sediments, bacteria, parasites, etc., it is absolutely essential that the beginner know the instrument with which he or she will be spending considerable time—the microscope (fig. 6-3). The microscope is a precision instrument used repeatedly in many areas of the medical laboratory to make visible those objects that are too small to be seen by the unaided eye. This is accomplished by means of a system of lenses of sufficient magnification and resolving power (ability to show, separate, and distinguish) so that small elements lying close together in a specimen appear larger and distinctly separated. Most laboratories are equipped with binocular (two-eye-piece) microscopes, but monocular microscopes
