Technique for Making Smears
1. Cleanse finger with 70 percent isopropyl alcohol and puncture it as described previously.
2. Wipe off the first drop of blood with dry, sterile gauze.
3. When a second drop forms, touch it lightly with a clean, grease-free slide. Place the slide on a flat surface with the drop of blood up. A smear can also be made with a drop of blood from a needle or collecting tube.
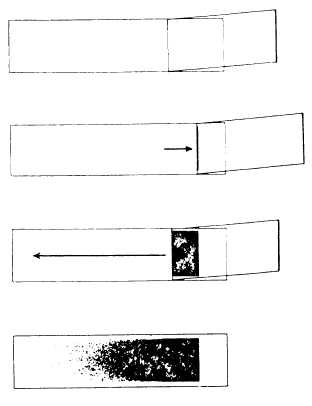
4. Hold a second slide between thumb and forefinger and place the edge at a 45 degree angle against the top of the slide, holding the drop of blood. Back the second slide down until it touches the drop of blood. The blood will distribute itself along the edge of the slide in a formed angle.
5. Push the second slide along the surface of the other slide, drawing the blood across the surface in a thin, even smear. If this is done with uniform rapidity and without wobbling the slide, a good smear will result. Try to keep the blood from reaching the extreme edges of the slides. Large cells have a tendency to stack up on the perimeter of the smear, and letting the smear reach the edges of the slide will aggravate this tendency. The smear should show no wavy lines or blank spots (see figure 6-9).
6. Let the smear air-dry.

Figure 6-9.—Making a blood smear.
Technique for Staining Smears
1. Place the smear on a staining rack. Flood it with about 1 ml of Wright’s stain and allow it to stand for 2 minutes.
2. Add an equal quantity of buffer. There should be no run-off of fluid from the slide. A little experimentation will show just how much stain and buffer the slide will hold. Mix the buffer and stain by blowing air through the rubber pipette tube and directing the current of air about the surface of the slide. Mix until a metallic (copper looking) film appears. Let stand for 3 minutes.
3. Wash with tap water, provided pH testing has shown the water to be neutral. If the
