CHAPTER 6 CLINICAL LABORATORY INTRODUCTION
A basic knowledge of clinical laboratory procedures is required of all hospital corpsmen, particularly those working at small dispensaries and isolated duty stations without the supervision of a medical officer. The patient’s complaint may be of little value by itself, but coupled with the findings of a few easily completed laboratory studies, a diagnosis can usually be surmised and treatment initiated.
Hospital corpsmen who can perform blood and urine tests and interpret the results are better equipped to determine the cause of illness or to request assistance, since they can give a more complete clinical picture. Consequently, their patients can get treated sooner.
In this chapter we will discuss blood collection, the microscope, and step-by-step procedures for the complete blood count and basic urinalysis.
BLOOD COLLECTION
The two principal methods of obtaining blood samples are finger puncture and venipuncture. Both methods have their advantages and disadvantages, but for most clinical examinations, blood is best obtained from a vein.
FINGER PUNCTURE
The finger puncture is used when a patient is burned severely or is bandaged so that the veins are either covered or inaccessible. It is also used when only a small amount of blood is needed.
Equipment Required
Arrange your equipment in an orderly manner and have it within easy reach. As with many other laboratory procedures, wash your hands prior to the procedure.
Procedure
Using the middle or ring finger, massage or “milk” the finger down towards the fingertip. Repeat this “milking” five or six times.
Cleanse the fingertip with an alcohol pad or Povidone-iodine solution and let dry.
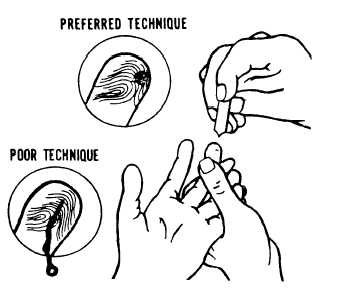
Take a lancet and make a quick deep stab on the side of the finger (off-center). To obtain a large rounded drop, the puncture should be across the striations of the fingertip (fig. 6-1).

Figure 6-1.—Finger puncture.
Wipe away the first drop of blood to avoid dilution with tissue fluid. Avoid squeezing the fingertip to accelerate bleeding as this tends to dilute the blood with excess tissue fluid, but gentle pressure some distance
