In the pre-transfer stage, grasp the used instrument firmly using the little finger as shown in figure 4-34 (step C). Sometimes, you may prefer to use the last two or even three fingers to receive the used instruments. Immediately following this action, you carry out the mid-transfer stage.
In this stage, place the next instrument into the dentist's hand with the working end positioned toward the treatment site, as shown in figure 4-34 (step D). When the treatment site is located on the maxillary arch, point the working end of the instrument up. Likewise, when the treatment site is on the mandibular arch, position the working end down. Do not release your grip of the new instrument until the dentist has firmly grasped the instrument. If the instruments become tangled during the exchange, this is usually caused by failure to parallel the handles before the exchange. The exchange of all instruments is done with firm, deliberate movements to give both the dentist and the assistant the feeling of confidence and to eliminate lost time and motion. Return the used instrument to its original position on the instrument tray and prepare to repeat the procedure with the next instrument required.
Refer to figure 4-35 for an overhead view (left- handed) of an instrument exchange during patient treatment. When you assist from the right side of the
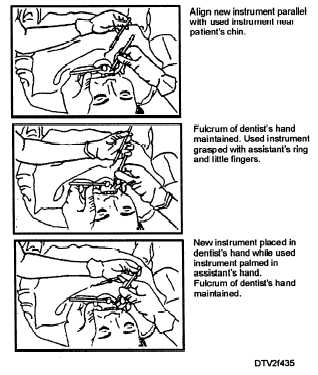
Figure 4-35. - Overhead view of instrument exchange.
patient, use your right hand in the same manner described for the left hand.
OTHER INSTRUMENT EXCHANGE TECHNIQUES. - Other instrument exchange techniques may have to be used depending on what type of instrument is being exchanged. These other techniques have been described in "Oral Surgery Assistance," Volume 2, chapter 5.
Handpiece and Bur Exchange
The dental handpiece can be exchanged for another instrument in the same manner described in this section. If two handpieces are exchanged, exercise caution to avoid tangling the hoses during the exchange.
During the operative procedure, the dentist holds the handpiece firmly over the patient's upper chest in the transfer zone, and then the assistant will loosen and remove the bur. The assistant next retrieves the bur that was selected by the dentist and places it into the dental handpiece and secures it. Always give the bur a gentle tug to ensure that it is firmly seated in the handpiece. If the dentist uses a different instrument between bur exchanges, change the bur outside the transfer zone, usually over the tray setup.
If the dentist changes handpieces and requires an exchange of burs in the returned handpiece, be sure to use the lock-out toggle switch for the handpiece before attempting to change burs. If you fail to do this, you could cause harm to yourself when the provider steps on the foot control to activate the other handpiece.
Preparing and Passing Materials
Dental materials are exchanged at the patient's chin in the transfer zone. This prevents materials from being dropped on the patient’s face. Small amounts of dental materials may be mixed and passed on a glass slab, paper pad, or dappen dish.
As a dental assistant, you must prepare dental materials at the proper time during the procedure. A material mixed too soon does not allow sufficient handling time. Knowing when to mix is equally as important as knowing how to mix. As with instruments, knowing the routine of the procedure lets you anticipate when the dentist will need the specific material. You should have the mixing equipment ready and the material in position and in place slightly before the time it is needed. Begin mixing only when you know the dentist is ready.
Continue Reading